New Product Development
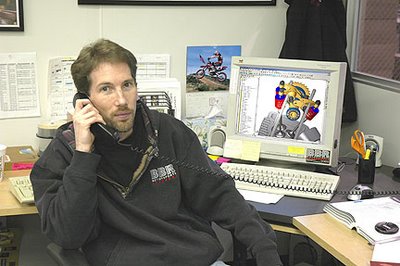
Let’s talk product development this week. I remember when we first started BBR, and being a young, broke, (and dumb) college student. I was trying to race motocross and I couldn’t figure out why everything cost so much in the motorcycle world. How could a works Honda cost 100 thousand dollars? There was no more metal in David Bailey’s works bike than in my stock 1986 CR250. Also, why didn’t the aftermarket companies make the parts I really wanted, in the color my buddies and I wanted them in? Well, growing the business at BBR has definitely given me, and my brothers, a crash course in reality. Trying to please the public, ourselves, and the racers is not as easy as it looks. I remember thinking that if I was in charge, I would just build the best parts all the time and the rest would take care of itself. I have come to learn that making the best parts on the planet is the easy part. Balancing the needs of the vendors, employees, media, advertising, R&D, market trends, all have an effect on what gets made and how it gets priced at BBR. Passion can only take you so far.
I get calls from time to time from people asking how we come up with so many new and unique items. When you ride and race as much as we do, the products almost invent themselves. Some products are more obvious than others. Any adult who jumps on a 50 can tell you that it needs taller bars. Anyone who has ever put a big bore kit onto a KLX 110 can tell you it needs a D-comp cam or a forged output shaft to stay in one piece. Every part evolves from a need in the industry. I will let Chris take it from here since he has designed and developed a good portion of the BBR products over the years:
There are many great new product ideas out there. We like to think that we come up with our fair share of them for our industry and it is always fun to see the many other great ideas that are developed in the MX world. But many people just see the finished product, and don’t even think of all the work that goes into the development of the product, and what it takes to bring it to the market. Anybody who’s ever picked up a wrench (even the lowly crescent wrench) has thought about something they would/could/should build. We get 4 or 5 people a month who show up with some idea that they think will change the world. Just cruise the internet forums and you’ll see dozens of ideas. Many are great ideas that are impossible to build. Others are rehashes of something somebody else did 10 or 15 years ago. Many ideas we see are nothing more than drawings. Drawing a part is (maybe) 1% of the process. If it is a napkin or pencil drawing, then it’s more like 1/2%. The process of taking the idea from the napkin to the market is very complicated, and takes much more than a great idea.
At BBR, new products generally start with Duane (or somebody else in the shop) riding and noticing something that needs changed. Sometimes it is nothing more than that an existing OEM part feels weird. Sometimes we break a part and know it needs a change. Sometimes we stumble onto some performance gain in a weird way. Other times we go after a performance gain by redesigning a part. Anyway, the idea isn’t the hard part. We have hundreds of great ideas getting fleshed out at any one time. Once a promising idea is found, it goes onto the next stage.
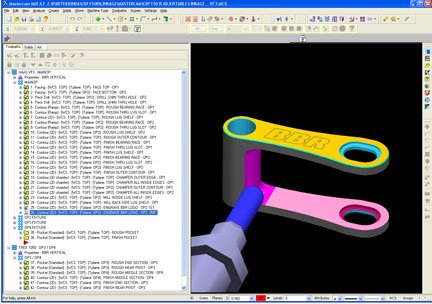
Generally, this means that somebody’s going to have to make a sample part to start testing. It might be that somebody in the shop (often Duane) will hand-make a part. We joke that we “cut/grind/weld” the first of many prototypes. If the part it too complex, we have to skip this first stage and move right to drawing the part in a design based computer program. You can’t exactly hand build a new transmission part. Depending on the part, though, we might go through a dozen prototypes before a final design is settled on. Somewhere in this process, I get a part (or idea of a part) that I draw (Kurt Hall, our lead engineer, also draws many of our products). When I say draw, that doesn’t mean I grab a pencil. In fact, I’m not much of a pencil artist. We’re talking about modeling the part on a computer. Some folks call it CAD (Computer Aided Drawing/Design/Drafting), but in modern language it is solid modeling. We use SolidWorks for all of our work. The cool thing about SolidWorks is that you can draw all the parts that make up a complete assembly, and check fit clearance, motion, etc. all before making a real part.
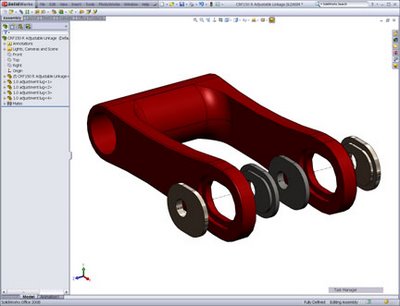
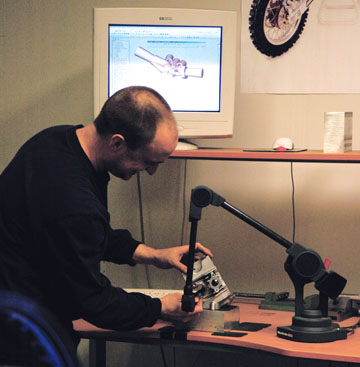 We also have a Microscribe digitizer that lets us get measurements of existing parts we need to model. It sounds a lot easier than it is. Drawing all these other parts can be 75% of the work of drawing the new part. Here is an example: When we made the adjustable linkage for the CRF150R, we had to draw the back half of the frame, the swingarm, the rotating link, a dummy shock, and a subframe. The frame drawing had to have enough information to level the bike so we could see where the seat would be. If you took our linkage, and drew it from scratch, it could be done in about an hour. The real setup time to draw the linkage actually took about a week due to the complexity and relationship to all of the surrounding parts.
 The other thing to remember is that it is easy to draw a part that can’t be manufactured. You have to consider what process is going to be used to build this part. If it is going to be welded, machined, forged, or cast; all will need a different design. If you are going to machine the part then you have to remember that a revolving cutter, of some diameter, is going to remove material. Some places simply can’t have square edges. The old joke is, “How to you drill a square hole?” (With a square drill bit of course!) If you are forging (or casting) you need draft angles built in so that the part can be removed from the tooling. If you are welding the part you have to account for heat distortion during welding. If the part must be heat-treated you must account for distortion. All these things must be considered in the early stages of drawing a part. Remember, too, that the drawing must be as precise as the part needs to be. If tolerances of .001” are required, then the drawing must reflect that. Simply writing on paper “.25” doesn’t cut it.
Once the part is drawn, it goes to our CNC programmers. We use MasterCam for all our CNC work. The SolidWorks drawing is imported into MasterCam and the programmers decide every cutter to use and every machining operation to carve a block of material into the part. The machining operations are tested on the computer hundreds of times, and then refined many times before any chips are actually hitting the floor. At the same time, fixtures are designed (and built) to hold the raw material in the CNC machines as it is cut. A simple part might have 4 or 5 different (highly precise) fixtures that have to be made, each being durable enough to survive thousands of uses on each part.
Once the first part is made, it goes back to step one. We fit the part and test it again and again. If it is a motor part, it goes on the dyno for hours of testing. On most parts, we generally let a wide range of riders try them out to see if they meet our expectations. Another round of the cut/grind/weld process often occurs at this point to refine the product further. Sometimes the part is perfect but doesn’t make enough of a difference to justify production. Sometimes it simply sucks. If this is the case, we go back to the drawing board (or computer, in this case). Changes are made to the drawing and it must go all the way back through the CNC guys for updates, then back to step one again…(and the cycle continues until we are 100% satisfied with the results).
Once the part is perfect, we’re still not even close to being done. In fact, the work so far is often the easy part (the fun part for certain). Packaging and instructions have to be worked out. We also must figure out whether the part needs to be further processed (anodized, painted, laser etched, etc). All that goes into the final product and we’re not even to the boring stuff. Somewhere in this journey we also have to figure out what the part is going to cost. You have to consider all the overhead involved. Things like cutters, machine time, finishing, packaging, marketing and material cost are obvious. But we have a business to keep running. The true cost of a part includes things like employee’s salary, insurance, and even the lighting bill.
Once we know what each part will cost to build, we have to figure out what it will sell for. The motorcycle industry has set expectations for what markup for distributors and dealers will be. Unlike many companies, BBR usually sets a reasonable retail price and then work backwards. Sometimes the price we need to sell it to distribution for is less than the part costs us to make!
Two more considerations work into making a new part. First, some parts we simply can’t make in the US. If you want something chrome plated, cast, or injection molded, the regulations in the U.S. make this next to impossible. These regulations and environmental concerns drive the cost through the roof. A good example is our U-Flow filter kit for the KLX110. The tooling for the 4 molded parts included in this kit would have been about $50,000 in the US. Overseas the tooling was considerably less. That helped us cut the retail cost to about half what it would have been. But remember, molded parts usually require a minimum of 1000 parts for each production run. The tooling and these minimum production runs require a huge investment for each new product. We were so confident in the U-Flow that it was a no-brainer, but there are many items that require a substantial gamble on our part. Luckily, we have had very few failures in our new product development, but the risks are always there.
Most of our new parts go to our race team first for testing. We raced the new V3 KLX110 frame for most of 2008 before releasing it to the public (it’s happening now). We’re not trying to keep the parts out of our competitor’s hands; we’re trying to make sure it is the best it can be before it is released. Nothing is better for testing the quality and durability of a part than racing.
As I said before, there are many great ideas out there that are just waiting to be developed. If you have an idea for a new part, let me give you a tip for getting your product idea manufactured. Don’t ever show up at a company with just a drawing of your idea. If you really believe in your part, invest the money to get it made. Build it, test it, and refine it. Then when you show up, you have something that already works. Do a cost analysis. What will this part cost to make (or have made) and what can it sell for? Prove to the manufacturer that your product can work and that it can make a difference. Figure out who is going to buy it and why. Anything else is just another idea.
Thanks to Chris for walking us through this complicated process. It is great to be in a position where we have the people and manufacturing capabilities to develop great ideas into finished products. I can’t think of anything we would rather do.
Question of the Week
“I just installed a big bore kit in my KLX 110 and after one ride, it’s like the bike is now stuck in second gear.” Michael
Oh, the dreaded output shaft! This is the shaft that the countershaft sprocket, first gear, and the kickstarter, rides on. It breaks the end off (opposite the countershaft sprocket) when the KLX motor is modified. When the shaft breaks it sticks the transmission in whatever gear it was in when it broke (if you’re lucky). Then your day is ruined. Worst case is that the engine case gets broken too. Our engine guy can change these things in his sleep but unfortunately you must split the cases to do the job. After changing four output shafts at MiniMoto SX one year we decided to take matters into our own hands. BBR came up with a forged output shaft that all but eliminates the problem. It also comes with first gear, because that is the next weakest link, and we used to blow that up too. If you are going to do a big bore kit, over 130cc, it is highly recommended that you switch the output shaft or switch to the D-Comp cam. Hope this helps! Duane
Blast from the Past
This week’s blast from the past is from the April 1996 issue of Dirt Bike magazine and the French magazine Moto Crampons. The Dirt-Bike Title read “If NASA Made Dirt Bikes” And the Moto-Crampons title read ”The Future Looks Perfect” In 1994 Chris was fighting pancreatitis and I was fighting a job that I really didn’t like. Life was pulling us away from the dream of motorcycles. When Chris was sitting in the Hospital I realized that life is way too short to not do everything you want. I told Chris and Brent that it was now or never. We had spent our whole lives working towards this – The bicycle shop, cars, college, etc…and the real world just isn’t fun. I don’t want to work a job I hate and sit at a computer whining about how I would do it. I want to be the guy doing it! I walked into my work and announced that they could all, “kiss my butt!” I wanted to make sure I couldn’t go back! I went home and told my family and friends. No one seemed quite as excided as I was (especially my pregnant wife) but that didn’t matter. We were on a mission to build the trickest dirt bikes in the world. We had about six months to get it together before the money ran out. Twenty hours a day were gladly (if not nervously) spent. We decided to build three bikes. An XR100, a 280, and a 400. The 100 was an aluminum framed YZ80 with a bored to 150cc XR100 engine. The 280 was an XR250 engine bored to 280cc with a hand made aluminum frame and gas tank. The 400 was a brand new for 1996 XR400 engine. The frame was aluminum and carried the oil plus used the 1996 CR250 geometry. I knew we were onto something when my lap times were better on the BBR 400 than on the 1996 CR250. When the bikes were complete I gave 4-Stroke friendly Dirt Bike Magazine a call to see if they would like to ride them. At first they blew me off and said they had all of the XR400s they could test, but we could send some pictures. The pictures were sent and Joe Kosch immediately called back and wondered how soon we could get to California. We loaded the bikes into the back of a borrowed pickup truck and headed to Valencia. Once there we became fast friends with Joe, Lumpy, and Ron. They shot the bikes for hours in the studio and then we headed to Texas canyon to do some test riding. Darrin Hoeft whipped the BBR400 for the cover shot of Dirt Bike. They shot me on the 400 for the centerfold of an article submitted to French magazine Moto Crampons. When these two magazines came out three months later we were in business. This turned out to be one of Dirt Bike magazine's biggest issues ever (even to this day). If you want to see more check out the video and magazines here:
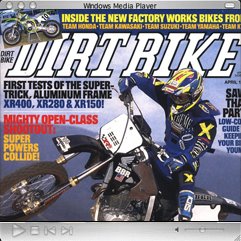
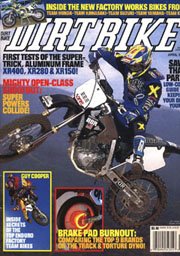
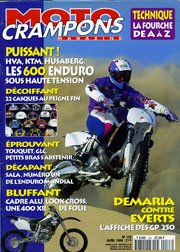
It’s been a wild ride for the past twelve years. Thanks for helping us live the dream! - Duane
I get calls from time to time from people asking how we come up with so many new and unique items. When you ride and race as much as we do, the products almost invent themselves. Some products are more obvious than others. Any adult who jumps on a 50 can tell you that it needs taller bars. Anyone who has ever put a big bore kit onto a KLX 110 can tell you it needs a D-comp cam or a forged output shaft to stay in one piece. Every part evolves from a need in the industry. I will let Chris take it from here since he has designed and developed a good portion of the BBR products over the years:

There are many great new product ideas out there. We like to think that we come up with our fair share of them for our industry and it is always fun to see the many other great ideas that are developed in the MX world. But many people just see the finished product, and don’t even think of all the work that goes into the development of the product, and what it takes to bring it to the market. Anybody who’s ever picked up a wrench (even the lowly crescent wrench) has thought about something they would/could/should build. We get 4 or 5 people a month who show up with some idea that they think will change the world. Just cruise the internet forums and you’ll see dozens of ideas. Many are great ideas that are impossible to build. Others are rehashes of something somebody else did 10 or 15 years ago. Many ideas we see are nothing more than drawings. Drawing a part is (maybe) 1% of the process. If it is a napkin or pencil drawing, then it’s more like 1/2%. The process of taking the idea from the napkin to the market is very complicated, and takes much more than a great idea.
At BBR, new products generally start with Duane (or somebody else in the shop) riding and noticing something that needs changed. Sometimes it is nothing more than that an existing OEM part feels weird. Sometimes we break a part and know it needs a change. Sometimes we stumble onto some performance gain in a weird way. Other times we go after a performance gain by redesigning a part. Anyway, the idea isn’t the hard part. We have hundreds of great ideas getting fleshed out at any one time. Once a promising idea is found, it goes onto the next stage.
Generally, this means that somebody’s going to have to make a sample part to start testing. It might be that somebody in the shop (often Duane) will hand-make a part. We joke that we “cut/grind/weld” the first of many prototypes. If the part it too complex, we have to skip this first stage and move right to drawing the part in a design based computer program. You can’t exactly hand build a new transmission part. Depending on the part, though, we might go through a dozen prototypes before a final design is settled on. Somewhere in this process, I get a part (or idea of a part) that I draw (Kurt Hall, our lead engineer, also draws many of our products). When I say draw, that doesn’t mean I grab a pencil. In fact, I’m not much of a pencil artist. We’re talking about modeling the part on a computer. Some folks call it CAD (Computer Aided Drawing/Design/Drafting), but in modern language it is solid modeling. We use SolidWorks for all of our work. The cool thing about SolidWorks is that you can draw all the parts that make up a complete assembly, and check fit clearance, motion, etc. all before making a real part.
 We also have a Microscribe digitizer that lets us get measurements of existing parts we need to model. It sounds a lot easier than it is. Drawing all these other parts can be 75% of the work of drawing the new part. Here is an example: When we made the adjustable linkage for the CRF150R, we had to draw the back half of the frame, the swingarm, the rotating link, a dummy shock, and a subframe. The frame drawing had to have enough information to level the bike so we could see where the seat would be. If you took our linkage, and drew it from scratch, it could be done in about an hour. The real setup time to draw the linkage actually took about a week due to the complexity and relationship to all of the surrounding parts.
 The other thing to remember is that it is easy to draw a part that can’t be manufactured. You have to consider what process is going to be used to build this part. If it is going to be welded, machined, forged, or cast; all will need a different design. If you are going to machine the part then you have to remember that a revolving cutter, of some diameter, is going to remove material. Some places simply can’t have square edges. The old joke is, “How to you drill a square hole?” (With a square drill bit of course!) If you are forging (or casting) you need draft angles built in so that the part can be removed from the tooling. If you are welding the part you have to account for heat distortion during welding. If the part must be heat-treated you must account for distortion. All these things must be considered in the early stages of drawing a part. Remember, too, that the drawing must be as precise as the part needs to be. If tolerances of .001” are required, then the drawing must reflect that. Simply writing on paper “.25” doesn’t cut it.
Once the part is drawn, it goes to our CNC programmers. We use MasterCam for all our CNC work. The SolidWorks drawing is imported into MasterCam and the programmers decide every cutter to use and every machining operation to carve a block of material into the part. The machining operations are tested on the computer hundreds of times, and then refined many times before any chips are actually hitting the floor. At the same time, fixtures are designed (and built) to hold the raw material in the CNC machines as it is cut. A simple part might have 4 or 5 different (highly precise) fixtures that have to be made, each being durable enough to survive thousands of uses on each part.
Once the first part is made, it goes back to step one. We fit the part and test it again and again. If it is a motor part, it goes on the dyno for hours of testing. On most parts, we generally let a wide range of riders try them out to see if they meet our expectations. Another round of the cut/grind/weld process often occurs at this point to refine the product further. Sometimes the part is perfect but doesn’t make enough of a difference to justify production. Sometimes it simply sucks. If this is the case, we go back to the drawing board (or computer, in this case). Changes are made to the drawing and it must go all the way back through the CNC guys for updates, then back to step one again…(and the cycle continues until we are 100% satisfied with the results).
Once the part is perfect, we’re still not even close to being done. In fact, the work so far is often the easy part (the fun part for certain). Packaging and instructions have to be worked out. We also must figure out whether the part needs to be further processed (anodized, painted, laser etched, etc). All that goes into the final product and we’re not even to the boring stuff. Somewhere in this journey we also have to figure out what the part is going to cost. You have to consider all the overhead involved. Things like cutters, machine time, finishing, packaging, marketing and material cost are obvious. But we have a business to keep running. The true cost of a part includes things like employee’s salary, insurance, and even the lighting bill.
Once we know what each part will cost to build, we have to figure out what it will sell for. The motorcycle industry has set expectations for what markup for distributors and dealers will be. Unlike many companies, BBR usually sets a reasonable retail price and then work backwards. Sometimes the price we need to sell it to distribution for is less than the part costs us to make!
Two more considerations work into making a new part. First, some parts we simply can’t make in the US. If you want something chrome plated, cast, or injection molded, the regulations in the U.S. make this next to impossible. These regulations and environmental concerns drive the cost through the roof. A good example is our U-Flow filter kit for the KLX110. The tooling for the 4 molded parts included in this kit would have been about $50,000 in the US. Overseas the tooling was considerably less. That helped us cut the retail cost to about half what it would have been. But remember, molded parts usually require a minimum of 1000 parts for each production run. The tooling and these minimum production runs require a huge investment for each new product. We were so confident in the U-Flow that it was a no-brainer, but there are many items that require a substantial gamble on our part. Luckily, we have had very few failures in our new product development, but the risks are always there.
Most of our new parts go to our race team first for testing. We raced the new V3 KLX110 frame for most of 2008 before releasing it to the public (it’s happening now). We’re not trying to keep the parts out of our competitor’s hands; we’re trying to make sure it is the best it can be before it is released. Nothing is better for testing the quality and durability of a part than racing.
As I said before, there are many great ideas out there that are just waiting to be developed. If you have an idea for a new part, let me give you a tip for getting your product idea manufactured. Don’t ever show up at a company with just a drawing of your idea. If you really believe in your part, invest the money to get it made. Build it, test it, and refine it. Then when you show up, you have something that already works. Do a cost analysis. What will this part cost to make (or have made) and what can it sell for? Prove to the manufacturer that your product can work and that it can make a difference. Figure out who is going to buy it and why. Anything else is just another idea.
Thanks to Chris for walking us through this complicated process. It is great to be in a position where we have the people and manufacturing capabilities to develop great ideas into finished products. I can’t think of anything we would rather do.
Question of the Week
“I just installed a big bore kit in my KLX 110 and after one ride, it’s like the bike is now stuck in second gear.” Michael
Oh, the dreaded output shaft! This is the shaft that the countershaft sprocket, first gear, and the kickstarter, rides on. It breaks the end off (opposite the countershaft sprocket) when the KLX motor is modified. When the shaft breaks it sticks the transmission in whatever gear it was in when it broke (if you’re lucky). Then your day is ruined. Worst case is that the engine case gets broken too. Our engine guy can change these things in his sleep but unfortunately you must split the cases to do the job. After changing four output shafts at MiniMoto SX one year we decided to take matters into our own hands. BBR came up with a forged output shaft that all but eliminates the problem. It also comes with first gear, because that is the next weakest link, and we used to blow that up too. If you are going to do a big bore kit, over 130cc, it is highly recommended that you switch the output shaft or switch to the D-Comp cam. Hope this helps! Duane
Blast from the Past
This week’s blast from the past is from the April 1996 issue of Dirt Bike magazine and the French magazine Moto Crampons. The Dirt-Bike Title read “If NASA Made Dirt Bikes” And the Moto-Crampons title read ”The Future Looks Perfect” In 1994 Chris was fighting pancreatitis and I was fighting a job that I really didn’t like. Life was pulling us away from the dream of motorcycles. When Chris was sitting in the Hospital I realized that life is way too short to not do everything you want. I told Chris and Brent that it was now or never. We had spent our whole lives working towards this – The bicycle shop, cars, college, etc…and the real world just isn’t fun. I don’t want to work a job I hate and sit at a computer whining about how I would do it. I want to be the guy doing it! I walked into my work and announced that they could all, “kiss my butt!” I wanted to make sure I couldn’t go back! I went home and told my family and friends. No one seemed quite as excided as I was (especially my pregnant wife) but that didn’t matter. We were on a mission to build the trickest dirt bikes in the world. We had about six months to get it together before the money ran out. Twenty hours a day were gladly (if not nervously) spent. We decided to build three bikes. An XR100, a 280, and a 400. The 100 was an aluminum framed YZ80 with a bored to 150cc XR100 engine. The 280 was an XR250 engine bored to 280cc with a hand made aluminum frame and gas tank. The 400 was a brand new for 1996 XR400 engine. The frame was aluminum and carried the oil plus used the 1996 CR250 geometry. I knew we were onto something when my lap times were better on the BBR 400 than on the 1996 CR250. When the bikes were complete I gave 4-Stroke friendly Dirt Bike Magazine a call to see if they would like to ride them. At first they blew me off and said they had all of the XR400s they could test, but we could send some pictures. The pictures were sent and Joe Kosch immediately called back and wondered how soon we could get to California. We loaded the bikes into the back of a borrowed pickup truck and headed to Valencia. Once there we became fast friends with Joe, Lumpy, and Ron. They shot the bikes for hours in the studio and then we headed to Texas canyon to do some test riding. Darrin Hoeft whipped the BBR400 for the cover shot of Dirt Bike. They shot me on the 400 for the centerfold of an article submitted to French magazine Moto Crampons. When these two magazines came out three months later we were in business. This turned out to be one of Dirt Bike magazine's biggest issues ever (even to this day). If you want to see more check out the video and magazines here:
It’s been a wild ride for the past twelve years. Thanks for helping us live the dream! - Duane
posted by DuaneBrown at
9:08 AM
![]()

<< Home